Creating your own flash video skin
Well, as promised here is a quick breakdown of the flash video player and how to create a custom skin.
First of all, there are several ways to import your video into flash. I have mainly been using the src and the import method.
Import Method
File > import > import video…You will be asked how you would like to deploy your video. I have been using Progressive as using the Flash Communication Server to stream it is a little pricey.
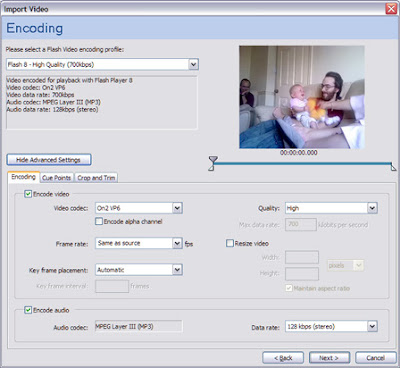
You will then be given several options for encoding your flash video. You can have a mess around with these settings to find exactly what you’re after.

When you get to the Skinning screen you need to select ‘None’ if you want to create your own player. Alternatively, there are plenty of built in ones you can choose from.
SRC method
This method uses the FLVPlayback component and references the actual .flv externally. Place an instance of the FLVPlayback component
window > components > FLV Playback - Player 8 > FLVPlaybackonto the stage.
Give it an instance name of ‘flvPlayback’.
Create an actions layer and add
flvPlayback.contentPath = src;This says the content path of the flvPlayback you just created is the src. This is the src referred to in the html you use to place your video player in your web page (more about this later).
Adding controls
Right, you now have your FLVPlayback component it is time to start adding some controls. Open the components palette again
window > components > FLV Playback custom UIand you will see a selection of controls available. Simply drag the ones you want onto the stage. In the actions layer you created earlier add:
flvPlayback.playButton = playbtn;
flvPlayback.pauseButton = pausebtn;
flvPlayback.playPauseButton = playpausebtn;
flvPlayback.stopButton = stopbtn;
flvPlayback.muteButton = mutebtn;
flvPlayback.backButton = backbtn;
flvPlayback.forwardButton = forbtn;
flvPlayback.volumeBar = volbar;
flvPlayback.seekBar = seekbar;
flvPlayback.bufferingBar = bufbar;
This assigns each control to the flvPlayback instance. Obviously you might not need to add all of these. It depends on which controls you intend to use. You will need to give each control an instance name. These need to match the names to the right of the equals sign in the code you just entered above. For example, the Play / Pause button would have an instance name of playpausebtn etc etc.
That is pretty much it for the basic flash player. If you export your movie (ensuring the flv is in the same location as the exported file) you can now add it to a page.
Adding the Timer
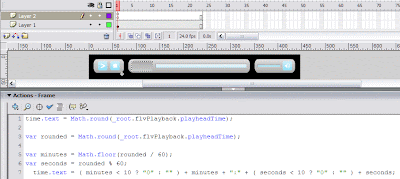
The timer isn't actually a component you can add to the stage but a small piece of actionscript you will need to add yourself. One thing with progressive download is the fact that until the entire movie is downloaded you cannot show the total time. You can, however, show a play head time by adding a movie clip to the stage. Inside that movie clip add a dynamic text box and give it an instance name of 'time'. Now, you want to check the play time every second so, in this movie clip, add a frame at 24 frames (or whatever you have your frame rate set to).
In the first frame add an actions layer and add the following actionscript:
time.text = Math.round(_root.flvPlayback.playheadTime);
var rounded = Math.round(_root.flvPlayback.playheadTime);
var minutes = Math.floor(rounded / 60);
var seconds = rounded % 60; time.text = ( minutes < 10 ? "0" : "" ) + minutes + ":" + ( seconds < 10 ? "0" : "" ) + seconds;
This basically takes the playheadTime of the FLVPlayback, rounds it and displays it in the time text box. The bit towards the end styles the time in 0:00 format. For example, with minutes, if there are less than 10 minutes then it adds a 0: else it adds nothing.

Adding your video to a html page
This is done using the following code:
<object classid="clsid:D27CDB6E-AE6D-11cf-96B8-444553540000" codebase="http://download.macromedia.com/pub/shockwave/cabs/flash/swflash.cab#version=6,0,29,0" viewastext="" id="Object1" height="380" width="448">
<param name="movie" value="player.swf?src=video.flv">
<param name="quality" value="high">
<embed src="player.swf?src=video.flv" quality="high" pluginspage="http://www.macromedia.com/go/getflashplayer" type="application/x-shockwave-flash" height="380" width="448"></embed>
Firefox and Internet Explorer embed the flash in slightly different ways which is the reason behind using the Object and Embed to do effectively the same thing.
The code marked in red is the source of the .flv file. This is also the same src that is referred to in the actionscript we added earlier. The code marked in blue is the swf you just exported of the player.
Customizing the flash player
Now you have your basic flash player working you can start adapting it to suit your needs.
Each of the controls is a simple movie clip. By clicking into each control your have the ability to alter the background shapes, sizes, colours etc of the buttons and icons.It's as simple as that.
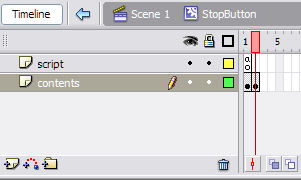
For example, double clicking the stop button gets you into the StopButton movie clip. Note, the movie clip name is StopButton but the actual instance name refered to in the actionscript is stopbtn. It is important not to mix these up.
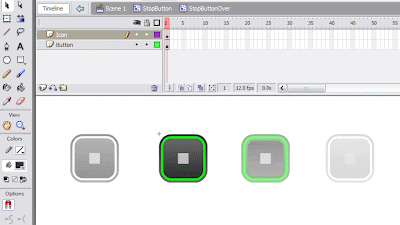
Here you will find an actionscript layer and 2 frames. The first one is the basic stop button, the second frame holds all the possible states of that button. E.g. hover, down etc.

Clicking in another level takes you to each individual state movie clip. For example, clicking on the hover movie clip opens up StopButtonOver clip where you can adapt the icon and background shape. If you keep clicking into the background shape and alter it it will affect all other places where that instance is placed on the stage. E.g. If you keep clicking into the stop button background until you can go no further then alter the colour, the background colour of all the other buttons will also change as they all use the same graphic as a background.

In conclusion
Well, I hope this has been useful. I noticed whilst typing that it is all a bit rambley so sorry if you have trouble following this but it shows the possibilities of customizing your own flash video skin. If you have any advice or tips please don’t hesitate to add a comment by clicking on the number of comments below and clicking ‘Post Comment’.


28 comments:
Post a Comment